
A sewer camera inspection uses a waterproof high-definition camera attached to a flexible push rod, which a plumber feeds through your sewer line — usually through an outdoor cleanout — to record live video of the pipe’s interior end-to-end. The footage reveals cracks, root intrusion, offsets, blockages, pipe material, and corrosion before any work begins. The whole process takes 30–60 minutes, costs $175–$350 in Charlotte, and is the only way to get an accurate diagnosis and an honest repair quote. If a plumber is offering you a trenchless sewer repair in Charlotte without first running a camera through your line, that’s a red flag worth pausing on.
What is a sewer camera inspection?
A sewer camera inspection (sometimes called a sewer scope, CCTV inspection, or pipe camera inspection) is a non-destructive diagnostic procedure where a plumber uses a waterproof video camera mounted on a flexible push rod to visually inspect the inside of your sewer lateral — the pipe that carries waste from your house to the city’s main sewer line.
The whole point: see what’s actually happening inside your pipes without digging anything up. Before this technology was widely available, diagnosing a sewer problem meant guessing where the damage was, then digging trenches across the yard until you found it. The camera changed that completely. Now a plumber can drop a head into a cleanout, watch the footage roll, and pinpoint a defect to within inches.
For Charlotte homeowners, this matters because the alternative — guessing — is expensive. The wrong diagnosis can cost you thousands in unnecessary excavation, a traditional dig you didn’t actually need, or a full trenchless replacement when a spot repair would have done the job.
How does a sewer camera inspection work, step by step?
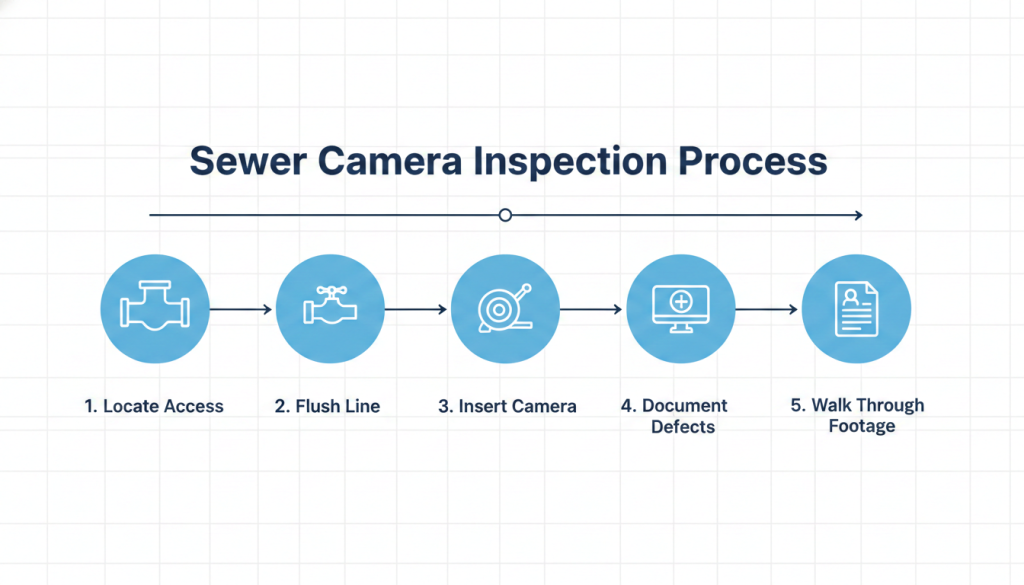
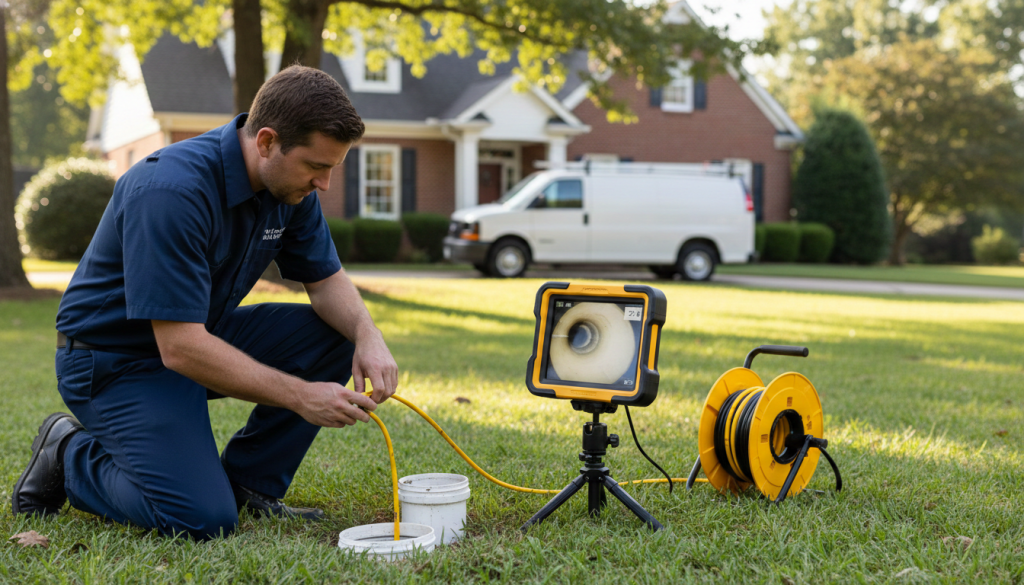
Here’s exactly what happens when a Pipeworks technician runs a sewer camera at your Charlotte home:
Step 1 — Locate the access point. The plumber finds the outdoor sewer cleanout (typically a capped 3- or 4-inch white PVC pipe sticking out of the ground near the foundation or in the yard). If there’s no exterior cleanout, an interior cleanout, basement floor drain, or roof vent stack can sometimes be used.
Step 2 — Run water through the line. Before the camera goes in, water is run through the sinks and toilets to flush debris, lubricate the line, and help float the camera through the pipe.
Step 3 — Set up the equipment. The technician unspools the camera reel, places drop cloths to keep the area clean, and powers on the monitor. The on-screen distance counter is reset to zero.
Step 4 — Insert the camera. The waterproof camera head — usually 1–2 inches in diameter with a ring of LED lights around the lens — is fed into the cleanout and pushed slowly through the pipe.
Step 5 — Navigate the line. The technician pushes the flexible rod forward, watching the live feed on a monitor. The camera bends around joints, P-traps, and sweeps. Distance is tracked in real time on the screen counter — for example, “27.4 ft from access point.”
Step 6 — Document defects. When a defect appears (crack, offset, root intrusion, scale buildup, broken pipe), the technician pauses, captures a still frame, marks the distance, and records video. Many modern systems include a sonde (a small radio transmitter) on the camera head — a locator above ground can pinpoint the exact spot in the yard where the camera currently sits, which is critical if a spot repair or excavation is going to follow.
Step 7 — Reach the city tap or termination point. The camera continues until it reaches the city sewer main, septic tank, or an obstruction it can’t pass.
Step 8 — Walk back through the footage with you. A reputable plumber will replay the recording on the monitor, point out each defect, explain what it means, and answer questions. This is the part most homeowners never see — and it’s the most important.
Step 9 — Receive the report. You should leave with a written or digital report that includes the recorded video file, still images of each defect, distance measurements, and a recommended next step.
What equipment does a plumber actually use?
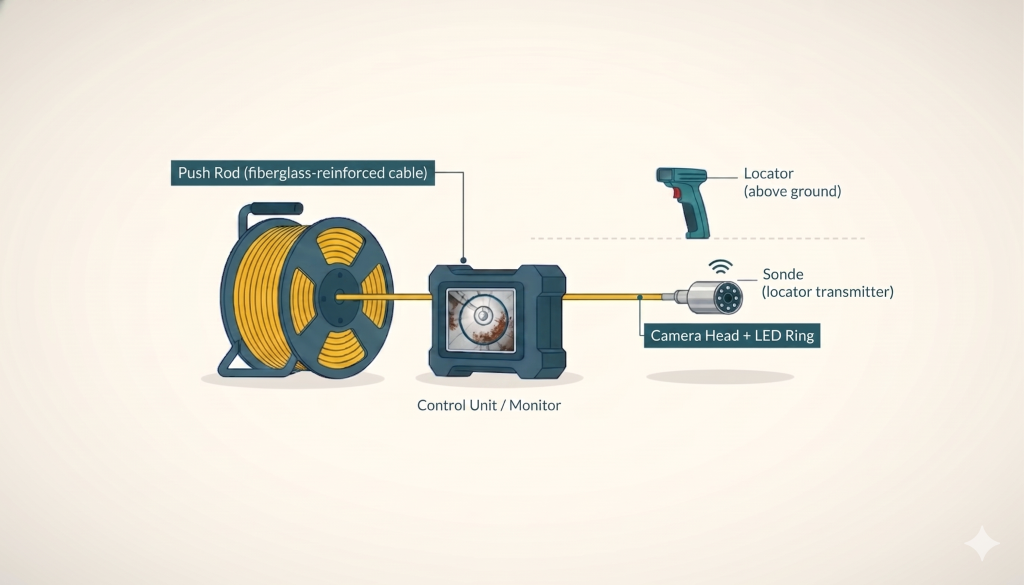
A modern residential sewer camera system has four main components:
- Camera head — a small waterproof HD camera (typically 1.5–2 inches in diameter for residential 3–6 inch pipes) with a ring of bright LED lights for illumination
- Push rod — a fiberglass-reinforced cable, usually 100–200 feet long, stiff enough to push through pipe but flexible enough to bend around turns
- Reel — the spool that holds the rod and connects to the control unit
- Control unit / monitor — a screen showing the live video feed, often with on-screen distance counter, recording capability, USB or SD card export, and sometimes Wi-Fi for sending footage to a tablet or phone
- Sonde + locator (optional but standard for trenchless work) — a radio transmitter built into the camera head that lets a handheld receiver above ground pinpoint the camera’s exact location and depth
The sonde is what makes camera inspection so powerful for trenchless planning. If the camera shows a crack at 32.6 feet from the cleanout, the technician can walk above ground with the receiver and mark the exact spot on the lawn — accurate to a few inches and a foot or two of depth.
What can a sewer camera see (and what can’t it see)?
What the camera CAN reveal:
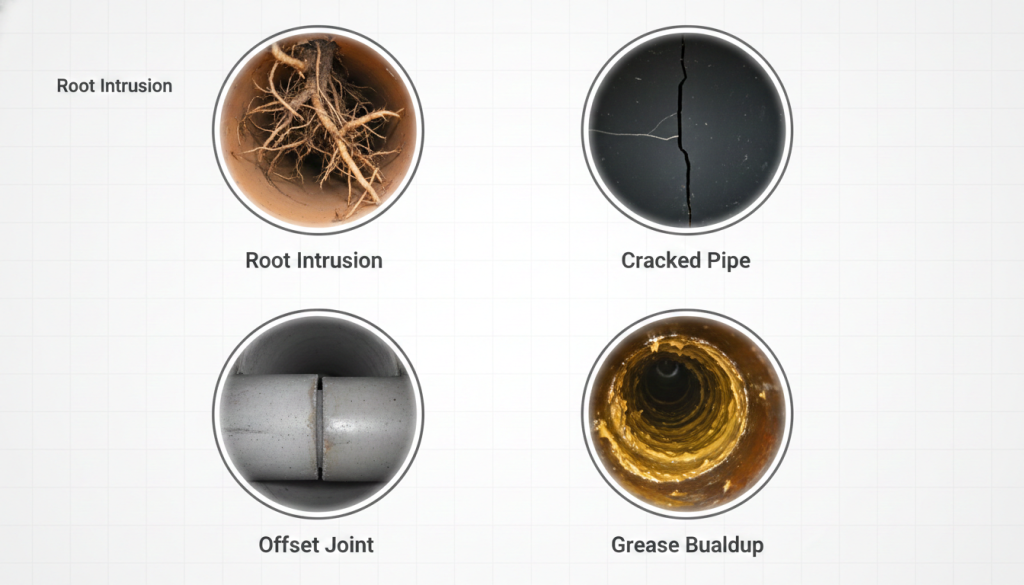
- Cracks, fractures, and holes in the pipe wall
- Tree root intrusion (one of the most common findings — more on that below)
- Offset joints where pipe sections have shifted
- Belly or sag (a low spot where water collects)
- Pipe collapse or partial crushing
- Blockages: grease, scale, paper, debris, foreign objects
- Pipe material (PVC, cast iron, clay, or Orangeburg)
- Corrosion, scaling, and surface deterioration
- Connection points where branch lines meet the main lateral
Tree root intrusion alone accounts for a huge share of what a camera will find. According to a peer-reviewed review published in the Journal of Infrastructure Systems and indexed by USDA Forest Service Research, tree roots cause more than 50% of all sewer blockages — and a camera is the only practical way to confirm whether you’re dealing with a few intruding roots at one joint (which can be hydro-jetted) or systemic root intrusion across multiple joints (which usually means a full trenchless replacement).
What the camera CAN’T see:
- Inside the pipe wall itself (it shows the surface, not the structural integrity beneath)
- Anything past a complete blockage or full collapse (the camera stops there)
- Outside the pipe — leaks into surrounding soil aren’t always visible
- Inside the city’s main sewer or behind a backflow device (and shouldn’t be sent there per InterNACHI sewer scope standards)
The camera is a diagnostic tool, not a structural test. It tells you what’s wrong; structural testing would tell you how strong what’s left actually is.
How long does a sewer camera inspection take?
For a typical Charlotte residential sewer lateral (50–100 feet from house to city tap), the full inspection takes 30 to 60 minutes from setup to report. That breaks down roughly:
| Phase | Time |
| Equipment setup and access | 5–10 minutes |
| Camera run through the line | 15–30 minutes |
| Footage review with homeowner | 5–15 minutes |
| Report and recording handoff | 5 minutes |
Older homes with hard-to-find cleanouts, or properties where the lateral has multiple branches, can run longer. Lines that are heavily blocked may need a hydro jetting service first, since the camera can’t see past a wall of roots or grease.
What does a sewer camera inspection cost in Charlotte, NC?
A standalone sewer camera inspection in Charlotte and Mecklenburg County typically runs $175 to $350, depending on the length of the line, accessibility, and whether locating (sonde) is included.
| Inspection Type | Typical Charlotte Cost |
| Basic camera inspection (residential lateral) | $175 – $250 |
| Camera inspection + sonde locating | $250 – $350 |
| Camera + hydro jetting bundle | $500 – $1,000 |
| Pre-purchase home buyer sewer scope | $200 – $400 |
For perspective: the cost of a collapsed sewer line repair starts at $5,000 and can reach $25,000 or more once excavation and restoration are included. A $250 camera inspection that catches a problem early — or proves you don’t need the expensive fix you were just quoted — is one of the highest-leverage spends a homeowner can make on plumbing.
When should you get a sewer camera inspection?
There are seven situations where a camera inspection is genuinely worth the cost:
- Recurring drain backups — if you’ve had to snake the same line more than once, the camera will tell you why
- Multiple slow drains at once — when the kitchen, shower, and toilet all drain slowly together, the issue is usually in the main lateral, not at any single fixture
- Sewage smell in the yard or wet patches that don’t dry — both signal a leak somewhere underground
- Before buying an older home in Charlotte — anything pre-1980 has a meaningful chance of clay, cast iron, or Orangeburg pipe underneath, and a $250 inspection can save you from a $20,000 surprise
- Before any major sewer repair quote — especially if a contractor is recommending full trenchless replacement
- Mature trees within 20 feet of the sewer line — a common scenario in older Charlotte neighborhoods like Plaza Midwood, Dilworth, and Myers Park
- Routine preventive check on a 30+ year old home — once every 10 years is reasonable, especially if you don’t know what pipe material you have. See our pipe materials overview to understand what you’re likely dealing with.
For background on what to look for before you call: the warning signs are well-documented on our leak detection page.
What should the inspection report include?
This is where reputable plumbers separate from shady ones. A real sewer camera inspection report should include:
- The recorded video file (or a link to it) — full uncut footage from access point to termination
- Annotated still images of each defect found
- Distance measurements from the access point to each defect (e.g., “Root intrusion at 27.4 ft,” “Pipe offset at 41 ft”)
- Pipe material identification for each section observed
- Severity ranking — which defects are urgent, which are recommended-to-monitor, and which are cosmetic
- A written recommendation for next steps, with the smallest reasonable fix listed alongside larger options
- Estimated total length of pipe inspected — so you know if any section was skipped due to obstruction
If the report is just “you need a full sewer replacement, here’s the price,” walk away. A homeowner needs the evidence to make the call — not just the conclusion. The InterNACHI sewer scope inspection guidelines — used by many home inspectors nationally — set a strong baseline for what a thorough inspection should document.
Why does the camera need to come BEFORE the repair quote?
This is the single most important point in this whole article.
A sewer camera inspection isn’t just a nice-to-have. It is the difference between an honest diagnosis and an expensive guess. Here’s why it has to come first:
- You can’t price what you haven’t seen. A trenchless reline of an entire lateral runs $8,000–$15,000. A spot repair on the same line might be $1,500–$4,000. The camera tells you which one is appropriate. Without it, you’re either over-paying or under-fixing.
- The camera reveals method-eligibility. Some pipes can be lined (CIPP), some can’t (a fully collapsed line needs traditional excavation). The video confirms which.
- It documents the starting condition. If anything goes sideways during the repair, you have a recorded baseline of what the pipe looked like before anyone touched it.
- It prevents both directions of upsell. A camera report keeps an honest plumber from quoting too small a fix (and missing real damage) AND from quoting too big a fix (and selling you replacement of healthy pipe).
This principle — camera first, quote second — is so well established that This Old House plumbing expert Richard Trethewey explicitly recommends sending a camera down the sewer line before any work begins to eliminate guesswork and produce an accurate estimate.
If you’re talking to a Charlotte plumber who’s quoted you a sewer repair without a camera report attached, you have two clean options: ask them to run the camera before you commit, or get a second opinion from a contractor who’ll do it. Pipeworks’s approach is camera-first on every job — see our customer reviews for how that plays out in practice.
Call to Action
Get a clear answer before you spend a dollar on repairs. Pipeworks Plumbing & Drain runs a full sewer camera inspection on every diagnostic call — with the recorded footage, annotated defects, and an honest recommendation handed back to you the same day. No quote until we’ve both seen what’s actually in your pipe.
📞 Call (704) 555-0000 or request a sewer camera inspection online →
Conclusion / TL;DR
- A sewer camera inspection uses a waterproof HD camera on a flexible push rod to record live video of the inside of your sewer lateral.
- The process takes 30–60 minutes and costs $175–$350 in Charlotte, NC.
- The camera can reveal cracks, root intrusion, offsets, bellies, blockages, corrosion, and the actual pipe material — but can’t see outside the pipe or past a complete blockage.
- Tree roots cause more than 50% of all sewer blockages, and the camera is the only practical way to tell whether yours is localized or systemic.
- Get one if you have recurring backups, multiple slow drains, sewage smells outside, before buying an older home, before any sewer repair quote, or every 10 years on a 30+ year old home.
- A real inspection report includes recorded video, annotated stills, distance measurements, pipe material, severity ranking, and the smallest reasonable fix recommended.
- Always camera first, quote second. Without the footage, any sewer repair price is a guess — sometimes an expensive one.